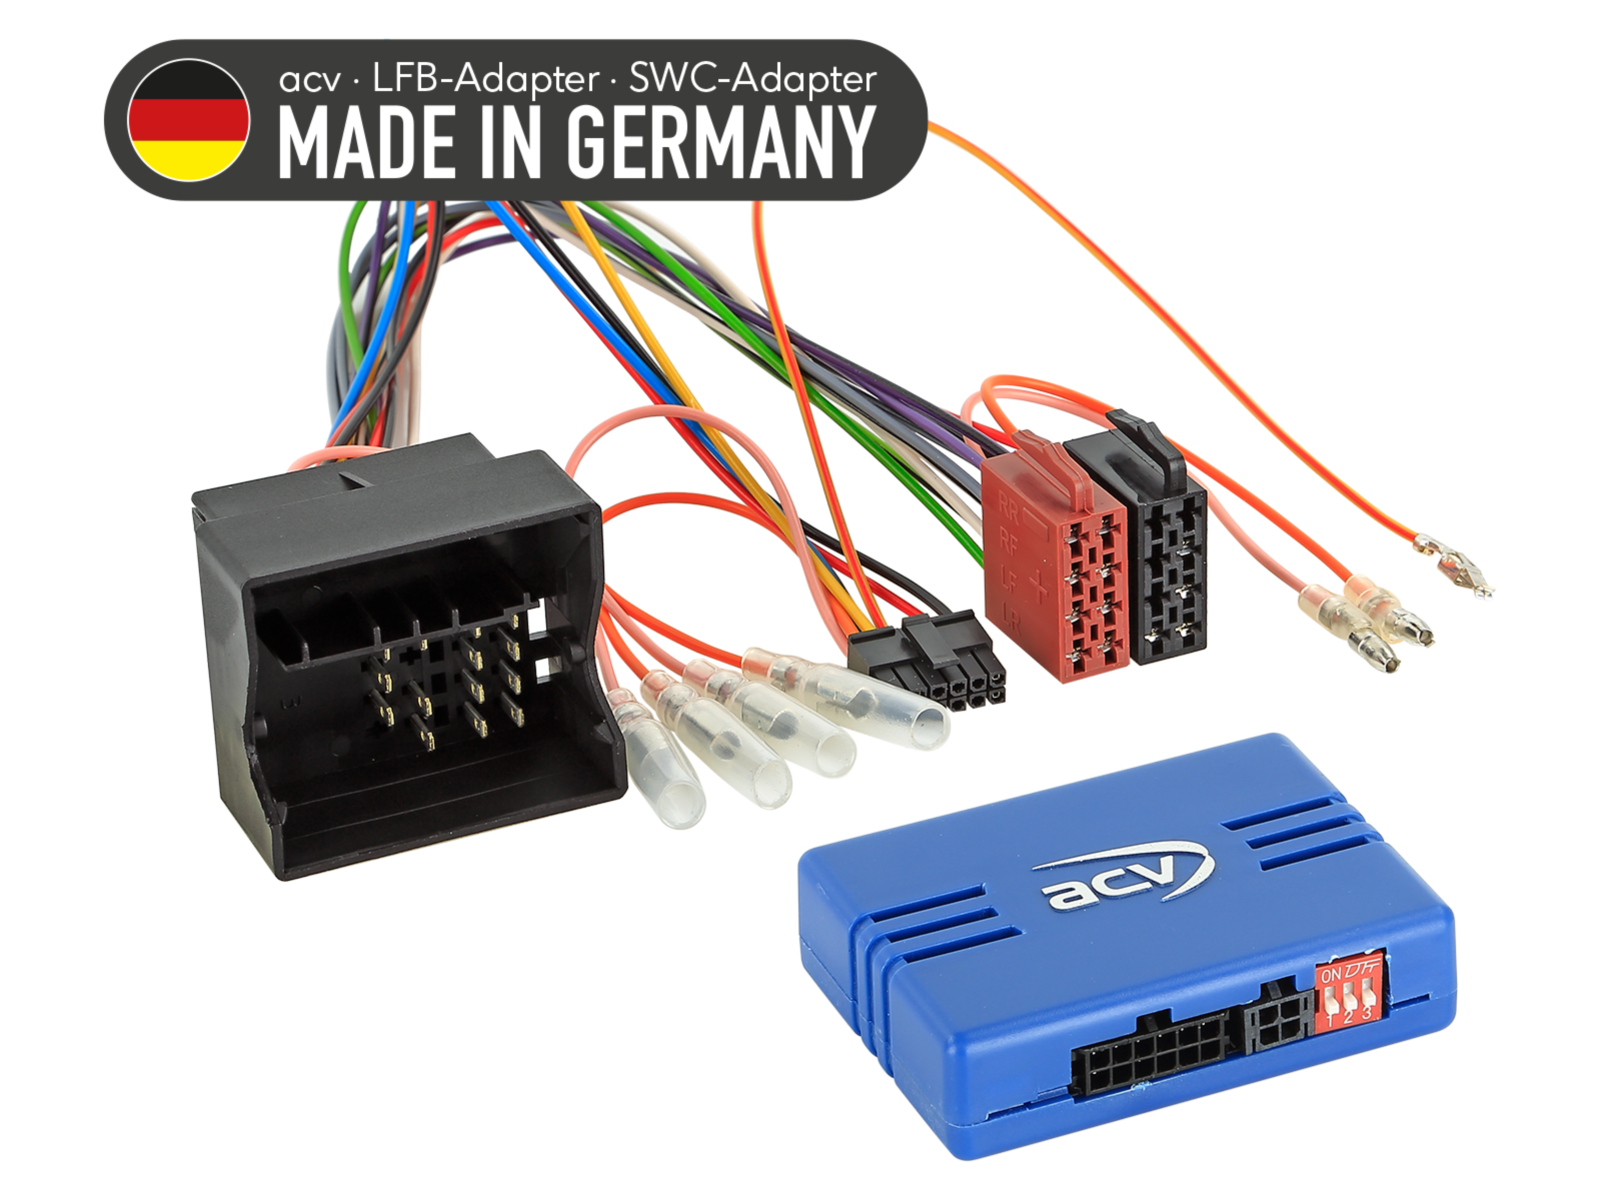
Steering wheel button control adapter for Ford ACV SWC 42A-1120-001-0
steering wheel adapter for Ford Galaxy II [WA6] (06->10), Galaxy II [WA6] (10->15), Kuga [DM2] (08->12), Mondeo III [B4Y/B5Y/BWY] (03->07), Mondeo IV [BA7] (07->14), S-Max [WA6] (06->15)
More about the product
More about the product
The sale is over
Steering Wheel Control Adapter for Ford ACV SWC 42A-1120-001-0
Maintain the original radio control functions from the steering wheel when replacing the original radio with an aftermarket unit. Depending on the vehicle's equipment, the range of functions, and the software of the newly installed radio, some functions may be limited or replaced by others. Compare the displayed wiring connectors with the connectors in your vehicle to ensure they match both technically and visually. Check if one of the listed OEM radios was originally installed. Verify the vehicle's functionality, system settings, and proper steering wheel control operation (SWC) before final assembly.
Designed for Vehicles
- Ford Galaxy II [WA6] (03/2006 -> 04/2010) - original OEM radio.
- Ford Galaxy II [WA6] (05/2010 -> 05/2015) - original OEM radio.
- Ford Kuga [DM2] (06/2008 -> 12/2012) - original OEM radio; vehicles without a 7" color OEM navigation with integrated air conditioning.
- Ford Mondeo III [B4Y/B5Y/BWY] (06/2003 -> 04/2005) - original OEM radio; vehicles with PDC: verify function without OEM HU, vehicles without PDC: use 42sfo011.
- Ford Mondeo III [B4Y/B5Y/BWY] (05/2005 -> 06/2007) - original OEM radio; vehicles with PDC: verify function without OEM HU, vehicles without PDC: use 42sfo011.
- Ford Mondeo IV [BA7] (06/2007 -> 10/2010) - original OEM radio; vehicles with PDC: verify function without OEM HU, vehicles without PDC: use 42sfo011.
- Ford Mondeo IV [BA7] (11/2010 -> 08/2014) - original OEM radio; vehicles with PDC: verify function without OEM HU, vehicles without PDC: use 42sfo011.
- Ford S-Max [WA6] (06/2006 -> 04/2010) - original OEM radio; vehicles with PDC: verify function without OEM HU, vehicles without PDC: use 42sfo011.
- Ford S-Max [WA6] (05/2010 -> 05/2015) - original OEM radio; vehicles with PDC: verify function without OEM HU, vehicles without PDC: use 42sfo011.
CAN Bus Information
Connectors and Power Supply:
- Connector: 40-pin Quadlock Ford.
Settings:
- Check the interface/radio DIP switches according to the instructions.
Compatibility with Vehicles and Wiring:
- Vehicles with OEM HU: 5000C / 6000CD / 6006CD / Sony; Audio Systems units with a front card slot.
- Vehicles with CAN Bus.
- Power Connector A:
- Pin 16: +12 V ignition (terminal 15) – not equipped.
- Pin 9: CAN-High blue/white (colors may vary).
- Pin 10: CAN-Low purple (colors may vary).
- Vehicles without analog SWC function in MQS connector B: pins 6 / 8 are not equipped.
Note:
- Vehicles without 7" OEM color navigation with integrated air conditioning.
- Vehicles without CAN Bus supported PDC: verify compatibility; if PDC does not function, use adapter 42sfo011.
Diagnostic LED Indication:
- Blue flashing: searching for CAN Bus signal.
- Blue steady: CAN Bus active.
- Red steady: active +12 V ignition current.
Provided Signals
- Pink: +12 V ignition terminal 15, max. 1.5 A.
- Orange: +12 V illumination terminal 58, max. 0.1 A.
- White: +12 V reverse, max. 1.5 A.
- Yellow/green, yellow/red: speed pulse (V-signal).
Important Additional Information
- To fully activate the adapter, a connecting cable for the specific brand of radio is required.
General Installation Guidelines
Verification Before Installation:
- Check all control functions and vehicle settings with the original OEM head unit.
- Disconnect the original radio (OEM HU) without voltage.
- Check all interface connections to ensure they are properly connected – without voltage.
Connection and Wiring Order:
- Check the interface hardware configuration – without voltage.
- Check the HU connection cable configuration – without voltage.
- Connect the cable to the HU according to the aftermarket device instructions.
- Connect other wires according to the device instructions.
- Connect the entire installation to the vehicle – connect the main power connection last.
- Perform the software configuration of the interface according to the product description or instructions.
- Configure the aftermarket HU (e.g., steering wheel control, camera, hands-free, antenna power).
- Conduct a functional test of the steering wheel control and communication with the vehicle.
Changing Interface and HU Cable Configuration:
- Make all changes without voltage.
- Repeat steps 5 to 8 listed above.
In Case of Interface or Vehicle System Failure:
- Reinstall the original OEM HU.
- Start the original unit.
- Initiate CAN Bus system shutdown.
- Check the interface hardware configuration.
- After CAN Bus shutdown, repeat steps 5 and 6 listed above.
When Modifying Connections or Wiring:
- Connections and modifications should only be performed by professionally trained personnel.
- All changes must be verified for manufacturer approval or warranty impact before connection.
- All modifications must be verified by measurement and comparison with the vehicle's wiring diagram before connection.
- Modifications are made at your own risk, without warranty of functionality.
- Modifications are performed at your own risk, without guarantee of excluding damage to the vehicle, device, or interface.
- Modifications to pre-installed wiring may lead to product warranty loss.
| Catalog number | 42A-1120-001-0 |
| Brand | ACV |
| Links | Official web presentation |
Evaluation
ask us
Recently viewed products
ACV SWC Land Rover 42XLR009-0 Free transport Quick previewsteering wheel adapter for Land Rover Discovery III (LA) (11/04->08/09) a Range Rover Sport I (LS) (05/05->08/09)299,60 EUR1 to 4 weeksACV SWC Land Rover 42XLR008-0 Free transport
 Quick previewsteering wheel adapter for Land Rover Range Rover III (L322/Vogue) (09/09->12/12)299,60 EUR1 to 4 weeks
Quick previewsteering wheel adapter for Land Rover Discovery III (LA) (11/04->08/09) a Range Rover Sport I (LS) (05/05->08/09)299,60 EUR1 to 4 weeksACV SWC Land Rover 42XLR008-0 Free transportQuick previewsteering wheel adapter for Land Rover Range Rover III (L322/Vogue) (09/09->12/12)299,60 EUR1 to 4 weeks