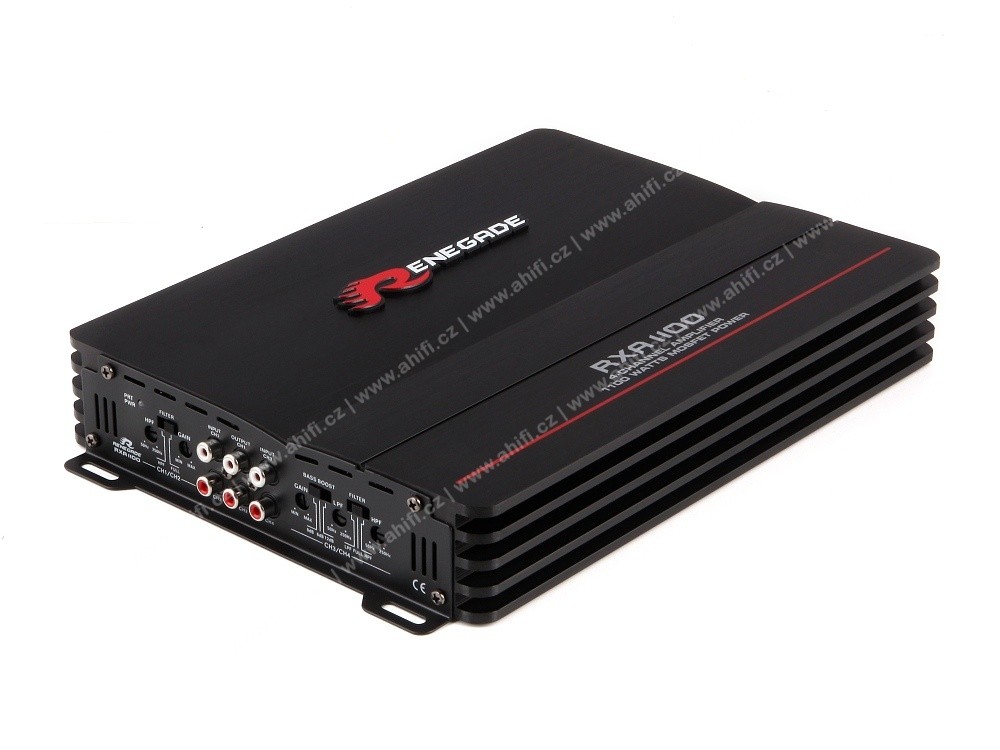
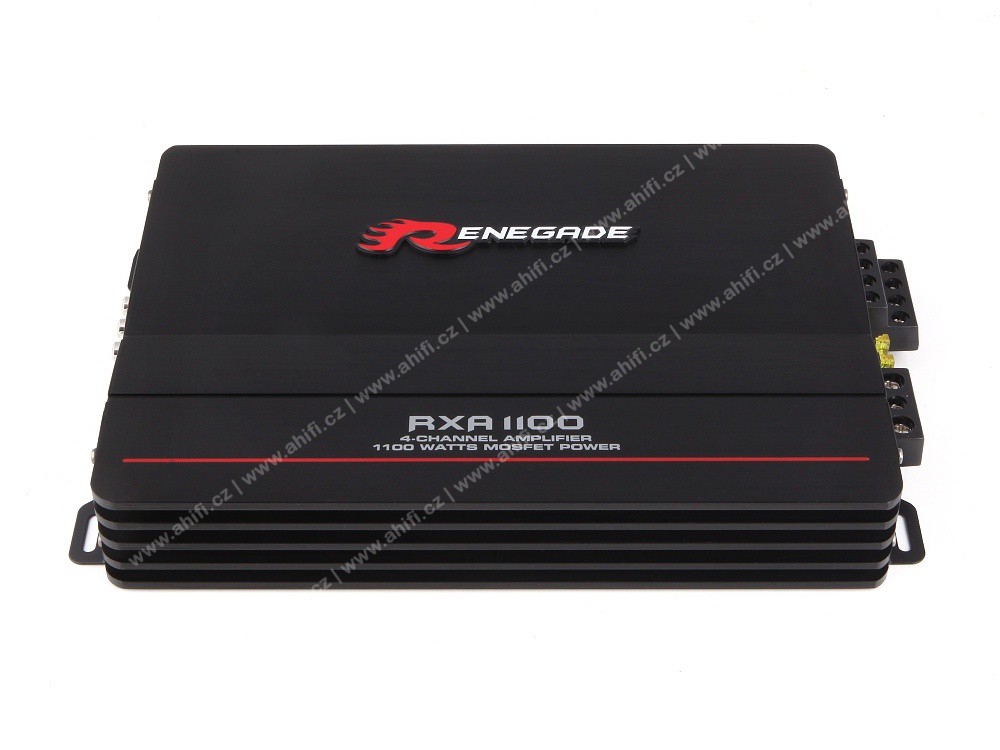
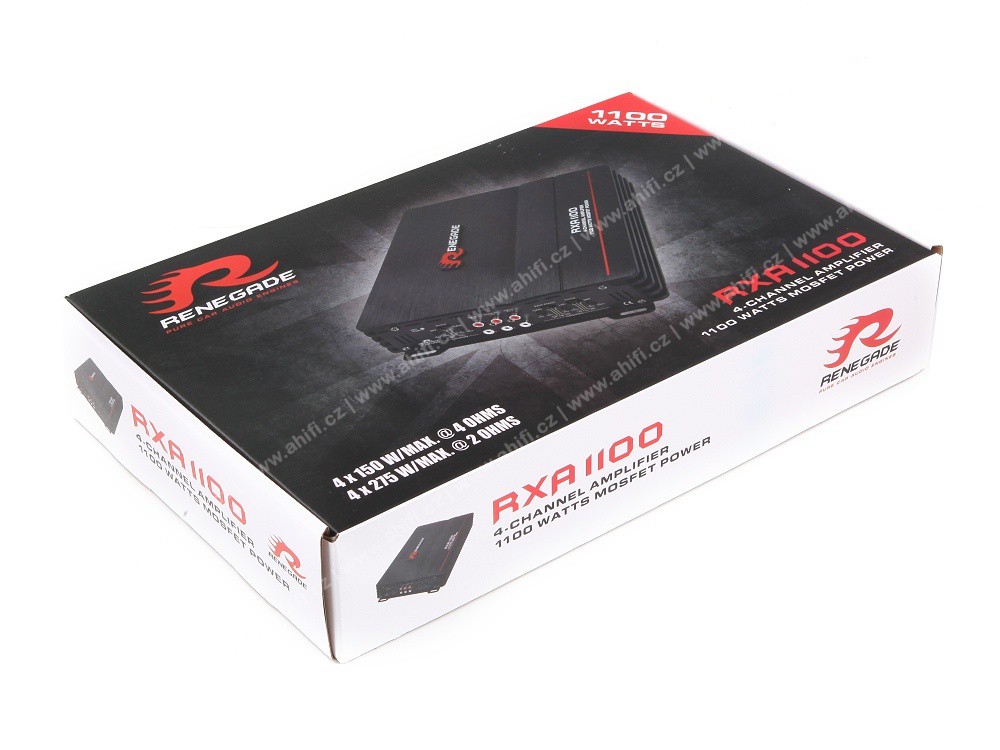
Renegade RXA1100 Amplifier
More about the product
- You can return the goods to us within 14 days
Renegade RXA1100 Amplifier
The Renegade RXA1100 is a four-channel amplifier designed for car-audio enthusiasts and anyone who wants to take their vehicle's sound to the next level. This amplifier delivers clean, dynamic and stable power for two pairs of speakers or two subwoofers, letting you enjoy stronger, higher-quality sound with minimal distortion. The amplifier’s construction features solid workmanship, efficient cooling and flexible wiring options for different audio systems. The Renegade RXA1100 is an ideal choice for those who want to improve the performance of an OEM audio system without complications and achieve balanced, clear sound across the entire frequency spectrum.
Main Features
- 4 channels - ability to power two pairs of speakers or two subwoofers.
- Powerful RMS output - plenty of power for clearer, more pronounced and richer sound.
- Low distortion - audible detail even at higher volumes.
- Solid and durable build - constructed with quality components for long life.
- Flexible connectivity - easy integration into various audio setups.
- Efficient cooling - stable operation even during extended, intensive use.
- Compact dimensions - easier installation in most vehicles.
- Sensitive RCA inputs - better compatibility with aftermarket head units.
How to Use the Renegade RXA1100 Amplifier - Basic Recommendations
The Renegade RXA1100 can be used in various audio configurations, from direct connection to a car radio to advanced high-power systems. For correct operation and the best results we recommend the following steps:
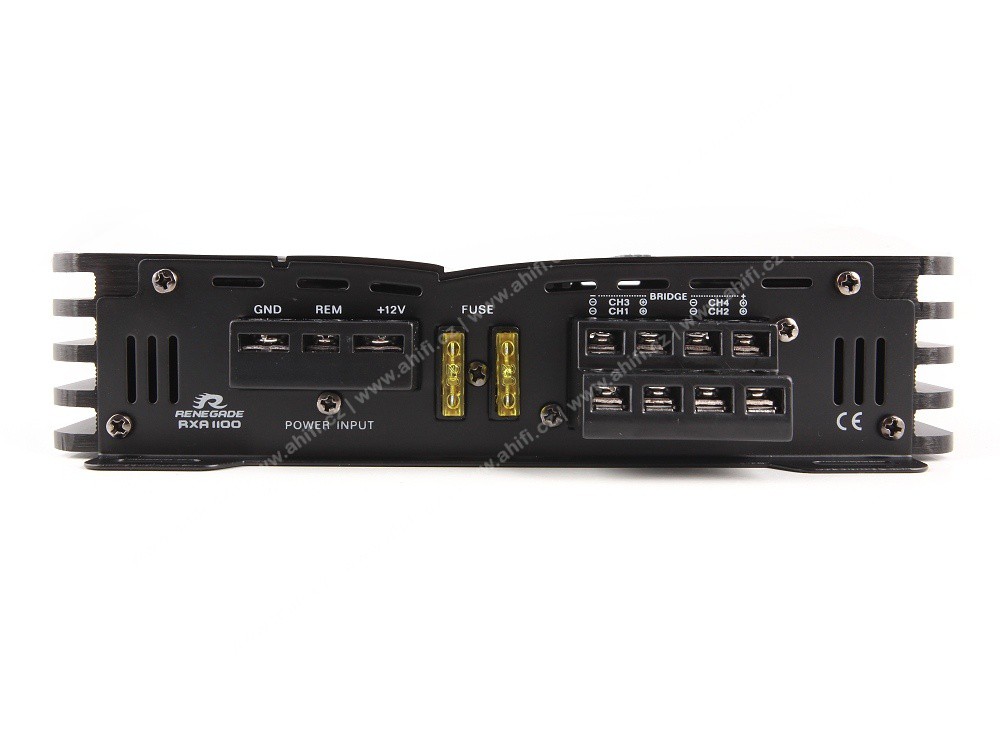
1. Prepare the power connections
- Ensure a stable 12 V power supply from the battery.
- Use appropriate fuses and cables with the correct gauge according to the amplifier’s requirements.
- Keep in mind that the fuse should ideally be placed within 30 cm of the battery or the point where the cable connects to the vehicle’s power system to protect the cable from the first point where current leaves the source.
- The fuse rating is determined by the cross-section of the power cable and its length, not by the amplifier’s power.
- Its main purpose is to protect the power cable and prevent short circuits or fire in case of a fault.
- When wiring the amplifier, connect the ground (minus) first and then the positive terminal (plus).
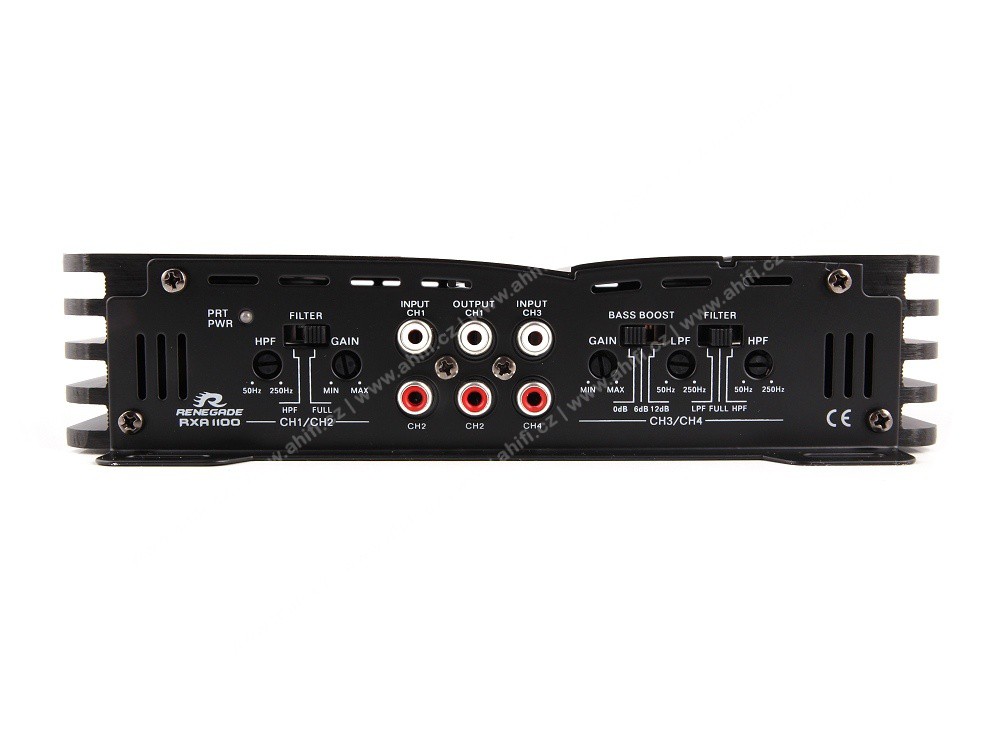
- Then connect the RCA cables carrying the low-level signal from an aftermarket head unit, or from a high-low converter connected to the OEM head unit if the amplifier does not accept high-level input directly.
- Finally, connect the speakers or subwoofer according to the planned system configuration, observing the recommended polarities and impedance values for optimal performance and component protection.
2. Connect inputs and outputs
- Connect the RCA inputs from the head unit (car radio / main unit).
- Connect the speakers or subwoofer to the amplifier’s respective output channels.
3. Configure
- Start by setting the crossover. Decide whether you will use the amplifier full-range or limit it to low frequencies (LPF), or to high frequencies (HPF), depending on the chosen speakers.
- HPF and LPF settings must be chosen correctly so that speakers operate in the optimal frequency range for which they are intended.
- The gain setting is used to match the amplifier to the input signal and to minimize distortion.
- The gain adjusts the amplifier’s input sensitivity to the signal we feed it. Gain is not the same as volume.
- If the amplifier’s input sensitivity range is, for example, 2 to 6 V and the head unit outputs 2.2 V, the gain will be set closer to the maximum. If the head unit outputs a stronger signal, e.g. 5.5 V, the gain will be set closer to the minimum.
- The first step when setting gain is to find the maximum volume of the head unit before distortion occurs.
- At that volume, adjust the amplifier gain so the amplifier does not begin to distort.
- This procedure ensures correct operation of the entire system and minimizes the risk of speaker damage.
- For fine-tuning you can later adjust Bass Boost and Treble Boost according to how the amplifier is used and personal sound preferences.
4. Ensure proper cooling
- Place the amplifier so there is enough space around it for heat dissipation.
- Avoid installing it in closed, hot spaces without air circulation.
5. Test and fine-tune
- On first power-up, raise the volume gradually and make sure all speakers play correctly and that the crossover settings have not caused any issue that could damage the speakers.
- If everything works correctly, proceed with fine-tuning the crossovers and other features like Bass Boost or Treble Boost to suit the listener’s taste and the system’s intended use.
About the Brand
Renegade Audio is an established German car-audio brand focused mainly on the entry-level product class, which has long been popular with customers due to its excellent price-performance ratio. It offers amplifiers, subwoofers, speakers and accessories intended for the first or budget-friendly upgrade of a vehicle’s factory audio system. Renegade products are designed with emphasis on simplicity, functionality and reliable operation, delivering a notable audio improvement without large investment. Renegade Audio is an ideal choice for anyone seeking honest car-audio solutions and wanting a lot of music for reasonable money.
| Catalog number | RXA1100 |
| Brand | Renegade |
| Links | Official web presentation |
| Energy class of the amplifierAmplifiers are divided into two basic classes: analog and digital . Analog amplifiers (A/B) have higher consumption requirements, but usually have a more natural sound. Digital amplifiers (D) have significantly lower consumption and higher efficiency, but the sound may not be as faithful as with classic analog amplifiers. | D |
| Number of amplifier channelsAmplifiers are divided into: - Monoblocks - 2-channel - 3-channel - 4-channel - 5-channel - 6-channel - multi-channel Each channel is used to power one speaker for the coaxial type, or one side if they are component speakers. Monoblock type amplifiers are mainly used for subwoofers. 2-channel are suitable for both subwoofers and, for example, the front pair of speakers in a car. 3-channel is used for front or rear speakers + subwoofer. 4-channel are used for front + rear speakers or 1 pair of speakers + subwoofer. 6 or 5-channel are used for 2 pairs of speakers + subwoofer, most often. Bridging means connecting the amplifier to a bridge, using the + pole from one channel and the - pole from the other channel. In most cases this is shown as "BRIDGED" on the amplifier. | 4 |
| RMS power into 4 ΩRMS power when loading speakers or subwoofer at 4 Ω. RMS power is the constant power of the amplifier and is one of the most important parameters when choosing an amplifier. | 4 x 75 / 2 x 150 Watts |
| RMS power into 2 ΩRMS power when loading speakers or subwoofer at 2 Ω. RMS power is the constant power of the amplifier and is one of the most important parameters when choosing an amplifier. | 4 x 135 Watts |
| Max. (maximum) power at 4 ΩPeak performance "Max." , which the amplifier can develop for a very short time. A relatively unimportant parameter. It is mainly a marketing move to attract customers to high numbers. | 4 x 150 / 2 x 550 Watts |
| Max. (maximum) power at 2 ΩPeak performance "Max." , which the amplifier can develop for a very short time. A relatively unimportant parameter. It is mainly a marketing move to attract customers to high numbers. | 4 x 275 Watts |
| High pass filter (HPF)HPF / HP or The "hi pass filter" offers the option of setting the amplifier using a potentiometer so that medium, possibly mid-bass and treble frequencies play upwards from a certain frequency. Example: Amplifiers most often have an HPF from 40 to 300 Hz. If we set the potentiometer to a value of approx. 150 Hz, the sound will be clipped so that it plays frequencies from 150 Hz up to the maximum upper limit of the entire frequency range of the amplifier, perhaps up to 20,000 Hz. We recommend setting this potentiometer in the range of 80-160 Hz. Thanks to this setting option, the speakers can handle a higher performance, as you will not overload them with bass in the lower frequency range. | 50 - 250 Hz |
| Low-pass filter (LPF)LPF / LP or "low pass filter" offers the possibility to adjust the amplifier using a potentiometer so that the lower band plays only the frequencies in a certain band that you need. This filter is used to adjust the frequency range for the subwoofer, so that it does not overload or distort the sound. Example: Amplifiers most often have an LPF from 20 to 300 Hz. We recommend setting this potentiometer in the range of 45-80 Hz. | 50 - 250 Hz |
| SubsonicA subsonic filter is essentially a high-pass filter for very low frequencies, typically 45 Hz or lower. Anything below this setting is weakened. The point is that the subwoofer does not go below the subsonic filter setting and does not overload itself with very low frequencies. A useful function, if set correctly, the subwoofer is not overloaded. | No |
| Bass boostBass boost or bass enhancement. With this function, the bass itself can be emphasized, at a high level of bass boost, the speakers and the subwoofer can distort a lot and the sound will be worse than better. We therefore recommend using the "bass boost" function wisely. With maximum use of bass boost, there is a risk of damage to the speakers and thus to the subwoofer. | Yes |
| Phase shiftPhase shift is a linear electronic oscillator that produces a sinusoidal output. It consists of an inverting part of the amplifier such as a transistor. The feedback network "shifts" the phase at the output of the amplifier by 180 degrees to the oscillation frequency and gives positive feedback. The Phase shift filter produces a phase shift that increases with increasing frequency. This is usually used when the subwoofer sub-assembly is out with the magnet, or when two amplifiers are connected externally. Phase Shift is also used with active speaker wiring, where the time shift of the speakers is set. The point is that the subwoofer does not play the bass late, and for this reason better amplifiers offer this phase reversal option. | No |
| The value of the fuses on the amplifierFrom the value of the fuses on the amplifier, you can get a true picture of the real performance of the amplifier. | 2 x 25A |
| High level inputsThe high-level input on the amplifier allows connection directly to the existing speakers in the car without additional purchase of an external high/low adapter. Important equipment in the case of installing an amplifier on an original car radio. | No |
| Socket input terminalsFerrule terminals allow better wiring contact to the amplifier. It is also a more secure form of terminals. If you are tightening the sleeve terminals, we recommend retightening them after 1 day, as the connected cable gradually compresses. | No |
| Input for wired remote controlIf the amplifier has a remote control input. | No |
| Remote control included in the packageSome models of amplifiers also come with wired remote controls in the package, which on one side plug into the amplifier and on the other side you have a potentiometer that you can place anywhere in the cabin. A common place to place the remote control is under the steering wheel. The advantage is the regulation of power, and therefore volume, depending on driving conditions and the mood of the crew in the car. | No |
| Dimensions of the amplifier | 220 x 48 x 300/330 mm |